AutoCAD PostScript Plotting to Scale
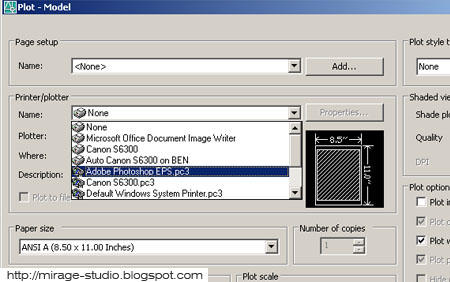
Tuesday, October 18, 2005The best way to plot to scale would be to create a PostScript files from AutoCAD via the Plot dialogue box. This requires few setup configurations to the PostScript plotter on your computer. To create EPS files, all you need to do is to add a plotter that uses the EPS format and then configure it to plot to a file rather than to a physical plotter.
AutoCAD does not automatically create the PostScript plotter for you when the software is install by default, it require minor configuration, a simple wizard that will guide you thru steps by steps.
To add a EPS plotter to AutoCAD you have to use the Add Plotter wizard.


(2) After clicking on it, a dialog box will appear, which tells you a little about the wizard. Click the "next" button to continue.
(3) The Begin dialog box will appear. This window will asks you to determine the type of plotter you want to add. Select the "My Computer" option and click the "next" button.


Select the appropriate model and then click the "next" button.
(5) The next dialog box to appear would be the "Import Pcp or Pc2". Ignore this dialog due to the fact that it is the configuration for a physical printer.Proceed by clicking the "next" button.
(6) Select the "Plot to File" option, this is to enable AutoCAD to plot to your computer instead sending your EPS plot to your printer plot.
(7) Next would be the naming of the file, you can leave it default or key in the preference name. It is adviceable to leave it as is.

(8) The Finish page gives you the option of editing the plotter configuration or calibrating the plotter. 
Checking The Plotter
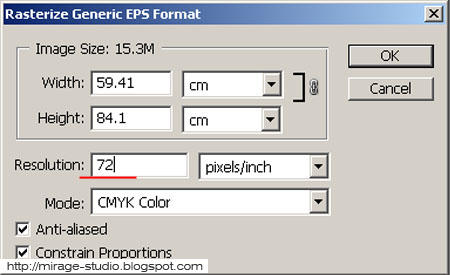
Importing EPS Common Mistake
One of the most common mistake when it comes to importing the EPS file into photoshop is setting the resolution, for example if you are using resolution 100 for your presentation board, then the importing of the EPS should also be at resolution 100. Different resolution would create a different scale for the drawings in the boards. make sure the resolution settings are the same.

Technorati Tags : Architecture , Tutorials
This entry was posted
on Tuesday, October 18, 2005 at 2:31 am.
You can skip to the end and leave a response.
![]()
![]()


» Post a Comment